₪CAUTION: Following these steps will guide you to erase all data permanently & beyond recovery.
WARNING: Following this procedure, you will be unable to boot into Windows / macOS
Afterwards, follow the appropriate guide here to restore the OS:
NOTICE: If you have a SSD then Parted Magic is not needed.
Follow appropriate guide above to reset your system.
NOTICE: If you have a computer with a MSI or ASUS motherboard, HP, or Dell from 2016 or later:
Secure erase feature is already integrated in the BIOS & Parted Magic is not needed.
[ Dell Data Wipe ]|[ HP Secure Erase ]|[ MSI & ASUS ]


Stage Ⅰ: Prepare Parted Magic
- Insert a 1GB or larger USB 3.0 thumb drive with nothing important saved on it as it will be erased.
- Download Parted Magic from MajorGeeks
- Download Rufus
- Launch Rufus and click SELECT button.
- Choose the ISO file downloaded in step 2.
- Click START button.
- You will receive a prompt to choose a writing mode. Choose write in DD image mode

- You will receive a warning prompt that ALL DATA ON DEVICE WILL BE DESTROYED, confirm the correct USB drive is selected and click OK.
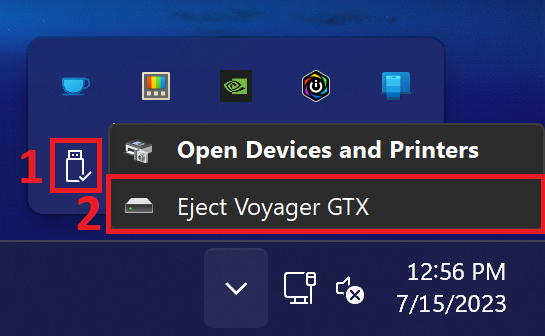
- When Rufus notifies that it’s finished, exit Rufus and eject the USB drive from the “SAFELY REMOVE HARDWARE AND EJECT MEDIA” panel in the system tray, then remove it.
Stage II: Boot Parted Magic
- Insert USB drive prepared in the previous stage into the computer you wish to erase.
- Power on and press the boot menu key:
Asus: F8
ASRock: F11
Gigabyte: F12
MSI: F11
Dell: F12
HP: Esc then F9 or F10
Lenovo: Enter or Novo pinhole then F12
Apple: hold OPTION key
For a complete list of boot keys by brand, visit:
https://kb.wisc.edu/helpdesk/page.php?id=58779 - Choose the USB option. On Macs it’s called EFI boot.
- You should now see the Parted Magic Boot Menu as it appears below.
Press Enter to boot with default settings.
- The system should boot into Parted Magic as it appears below within about 60 seconds.
If that is not the case, go into BIOS and disable secure boot then try again.
For Macs, you need to disable startup security.
- Launch Erase Disk
- For systems with SATA or M.2 SATA drives, choose:
Secure Erase – ATA Devices
For systems with M.2 PCIE or NVME drives, choose:
NVME Secure Erase - You may see the word Frozen, if so click Sleep
The system will auto-wake after a moment with the drive unfrozen
If Not Frozen, proceed to the next step - Check the checkbox next to each drive you want erased, choose Enhanced if available, click Continue.

- Check the Allow checkbox, click Start Erase.
- The military standard erase procedure completes in seconds on most modern systems that have a SSD, if you have traditional platter hard drive(s) it can take several hours.
- You will receive a prompt stating whether or not the erase was successful upon completion.