Our Dell G5 5000 pre-built gaming computer review looks at quality & Dell’s shady billing practices. One video won’t be enough to contain all the issues we had with Dell’s prebuilt.
Author: Mr. Robot
This video talks about what to do with your PC after it’s been built. We talk about how to check CPU & GPU temperatures, bottlenecks, and our top programs for your PC (old or new!).
- WARNING: Beware of using monitoring apps such as HwInfo listed below and others such as SideBar when using NZXT CAM or Corsair iCue software as it can occupy or interfere with the sensors and prevent your system from being cooled properly.
- NZXT and Corsair have their own app monitoring features so if you use those apps you should either use them exclusively OR see this article for bloat-free alternatives: Improved Fan & RGB Control for Gamers » Mr. Robot
- NZXT and Corsair have their own app monitoring features so if you use those apps you should either use them exclusively OR see this article for bloat-free alternatives: Improved Fan & RGB Control for Gamers » Mr. Robot
- HWInfo Download
For testing / temp monitoring - FrameView Download
For testing / temp monitoring - CPU-Z Download
For CPU and RAM identification - GPU-Z Download
For GPU identification - DDU Download
For display driver removal
- Don’t overthink thermal paste, recommend Thermal Grizzly Conductonaut for K / X, Hydronaut for non-K / non-X.
- 6-cores is the sweet spot for gaming, spare cash is better spent on GPU, or another component.
- Stream using NVENC, it’s way more efficient than X.264 with no FPS impact.
- Don’t overtighten.
- Mounting pressure on CPU matters.
- PCPartPicker.com is your best friend.
- PC assembly order matters.
- Avoid water pumps in the top position.
- Always keep the pump fed in a custom loop and use minimum pump speed without negatively impacting thermals e.g. 20%
- Easy soft tube installation method
- Always leak test your loop
- Lower GPU utilization at lower resolution
- Invest in a proper toolkit with a PH2 to prevent stripping
- Always prepare a fresh windows installer the day of build to avoid wasting time on updates. See How to wipe and reload windows
- Avoid sharing boot drives or reusing old installs
- Update BIOS and enable XMP
- Improve memory compatibility with voltage and frequency
- SLI and crossfire are dead, do not buy multiple GPUs
- ITX cases can house epic gaming builds
- Graphics card cooling differences
- Stick to one RGB ecosystem
- Improved Fan & RGB Control for Gamers
- Ready up drivers on a USB
- Avoid common motherboard bloatware
- Correct DRAM DIMM slot installation, typically 2 and 4
- Clean your GPU drivers with DDU
- Aim for balanced PC case airflow
- Negative pressure generally works better for ITX, positive for ATX
- Skip Nvidia’s 12VHPWR adapter
- Use a coolant sensor if custom loop watercooling
- Overclocking sucks in 2023
- lower temps = higher clocks
- Avoid premium coolers on budget GPUs
- toggle off startup apps for a cleaner launch
- Disable windows mouse acceleration
- Choosing the right PSU for your build
- Do not overspend on motherboard
- Noctua NF-A12x25 = king 120mm fan, Arctic P12 PWM same noise and performance for much better value
- Air vs. liquid coolers
- Plug in cables before mounting large air cooler
- Avoid PCI gen 3 risers for gen 4 cards
- CableMod ModMesh cables are worth it
- Do not mix cables between power supplies
- Intel i5 14400 = midrange gaming king
- GPU undervolting for lower temps & noise
- HWinfo = ultimate PC monitoring
- Generally avoid DDR kits >3600MHz for Ryzen AM4
- RAM sweet spot in 2021
- CPU stock coolers are limiting
- Choose M.2 nVMe drives, avoid SATA
On Windows 10, those icons you see on files and apps are stored in the icon cache database to allow the operating system to display them quickly on the screen. The process of caching icons, instead of retrieving them from the source, helps to prevent your system from getting bogged down by the mere task of “showing icons”.
However, as the database grows, the odds of icon cache database getting corrupted also grows. When this happens, icons on your desktop and throughout the operating system may not render correctly or even appear broken.
Although Windows 10 doesn’t include an option to reset the database, you can still fix the problem using a few commands in Command Prompt.
In this guide, we’ll walk you through the steps to rebuild the icon cache database on your computer when they appear blank or broken.
How to rebuild the icon cache database
To rebuild the icon cache database on Windows 10, close any application that you may be running, and then do the following:
- Open Start and do a search for Command Prompt.
- Right-click the result and select Run as administrator.
- Type the following command to navigate to the icon cache database location and press Enter:
cd %homepath%\AppData\Local\Microsoft\Windows\Explorer - Type the following command to verify the icon cache database files are at the location and press Enter:
dir iconcache*
The output of the dir command should list these database files:- iconcache_1280.db
- iconcache_16.db
- iconcache_1920.db
- iconcache_256.db
- iconcache_2560.db
- iconcache_32.db
- iconcache_48.db
- iconcache_768.db
- iconcache_96.db
- iconcache_custom_stream.db
- iconcache_exif.db
- iconcache_idx.db
- iconcache_sr.db
- iconcache_wide.db
- iconcache_wide_alternate.db
- Type the following command to stop File Explorer and press Enter:
taskkill /f /im explorer.exe
Important: Once you terminate File Explorer, your desktop background and taskbar will disappear, leaving a black screen — but it’s OK, it’s only temporarily. You need to close File Explorer to be able to delete the icon cache files. Otherwise, you won’t be able to do it. - Type the following command to delete the iconcache files and press Enter:
del iconcache*
Quick Tip: If you get access denied trying to remove the files, you’re probably not running Command Prompt with as an administrator. Repeat these steps, but making sure Command Prompt starts with administrative privileges. - Type the following command to verify that you successfully deleted the icon cache files and press Enter:
dir iconcache*
If you still see some iconcache files, then it’s likely that some apps are still running, which will prevent you from deleting the database files. Make sure to close them all, and repeat the steps. - Type the following command to start File Explorer and press Enter:
explorer.exe - Close Command Prompt to complete the task.
Every gaming laptop has too much voltage going to the processor from the factory.
This can be decreased by up to 200mV (millivolts) or more to significantly reduce the operating temperatures and improve sustained clock speeds / performance.
The increased thermal headroom afforded by reducing the voltage translates to higher sustained clock speeds than with more voltage.
Computer manufacturers do this intentionally to decrease the lifespan of the product.
On average 20-30% FPS improvement in games + 20-30% reduced operating temperatures.
Below are guides to undervolt, however the exact voltage reduction for your particular processor can be found only via extensive testing or by hiring Mr. Robot. Submit a Ticket.
8750H / 8th Gen
9750H / 9th Gen
10750H / 10th Gen: Requires BIOS MOD
Enable undervolting on your Dell XPS 9500/9510/9700/9710 (or others) – Dell – NotebookTalk
| About time: Class action lawsuit filed against Apple |
|---|
| 5/9/2020 |
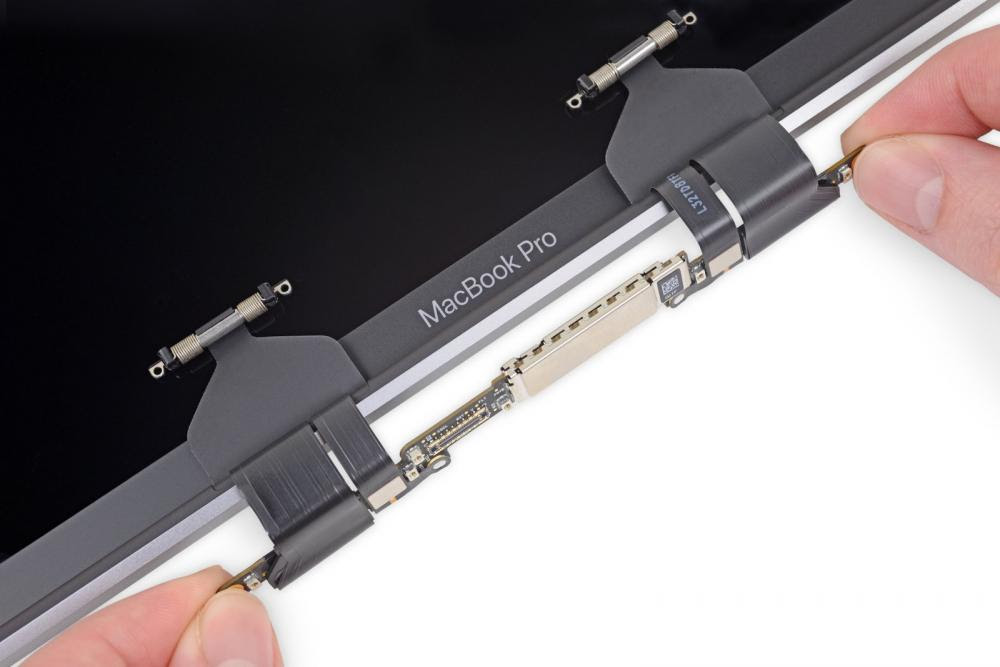 A class action lawsuit filed in Northern California federal court alleges that Apple knowingly sold MacBook Pros that contained display cables destined to fail, in what we and others termed “Flexgate”. The suit also claims Apple intentionally responded with a limited display repair program response that only included a limited number of less-expensive MacBooks, and did not cover the issue with its AppleCare extended warranties. The suit, filed by the Parris law firm of Lancaster, CA, includes in its proposed class anybody who bought a MacBook Pro in 2016 or later, and asks Apple to expand its free repair coverage to 15-inch models. The filing contains a number of iFixit photos demonstrating the relatively short cables wrapped around the hinged display. |
| > Read more about the lawsuit |
| Seems like Apple knew about Flexgate all along… |
|---|
| 3/10/2019 |
 Remember Flexgate? The design flaw causing certain MacBook Pros to fail after repeated opening and closing? Well, it looks like Apple just secretly plopped in a much longer flex cable to address the problem. |
| > Read more |
| We investigated the design flaw behind “stage light” |
|---|
| 1/26/2019 |
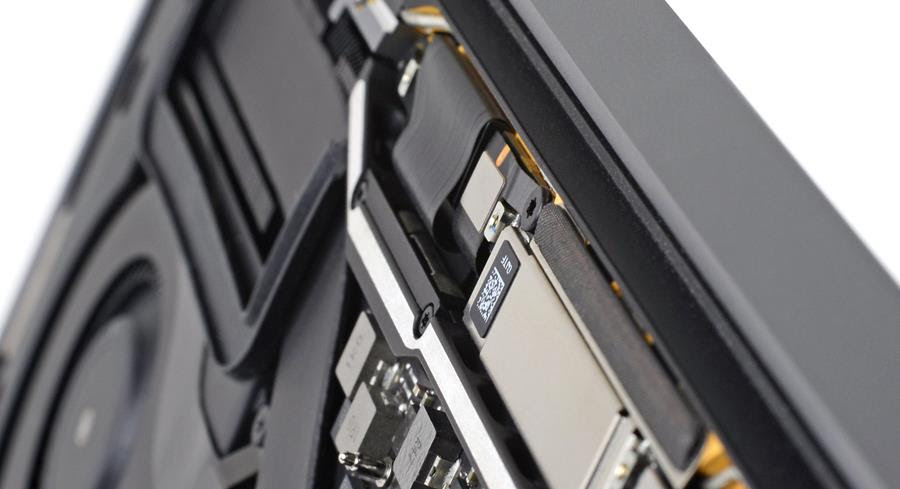 The Touch Bar generation of MacBook Pro has been experiencing a host of display issues, including the infamous “stage light” effect. We cracked open a 2016 MacBook Pro to get to the root of the problem (aka Flexgate). |
| > Read more about the iFixit Investigation |
The FlexGate issue is typically over $500 to fix, which exceeds the system value due to overpriced display assemblies & depreciation.
It was so bad that they had to start a service program:
MacBook Pro Display Backlight Service Program
Sadly, it excludes 15-inch models with the same issue.
The program covers eligible MacBook Pro models for 5 years after the first retail sale of the unit or 3 years from the start date of the program, whichever is longer.
Under this program, you could have the display replaced for free anytime within 5 years of purchase .
If you are experiencing this issue, you may want to consider taking it to the apple store and showing them how it works fine if you don’t open the screen all the way. See video below.
I have observed Apple them continuing to support the program beyond its coverage period, leaving your system vulnerable to their decisions. Otherwise, the repair expenses outweigh the value, as you’re compelled to purchase an excessively priced display assembly for a simple cable issue.
Don’t want to deal with Apple? Mr. Robot offers concierge service for this issue, for more details, scroll past the videos.
Also see: Apple’s New FlexGate, Caused By Dust
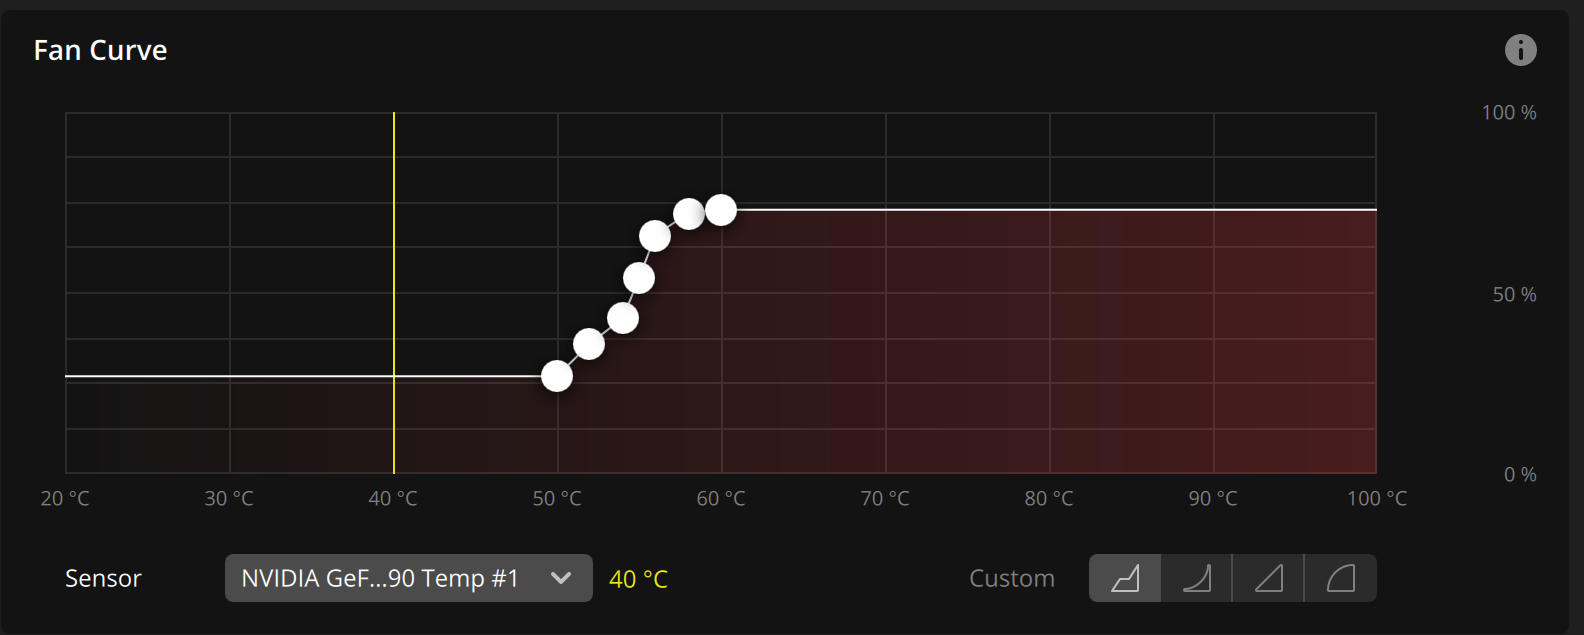
By default my systems that feature Corsair water cooling are configured to follow the hottest running component which is usually the GPU–by far for gamers.
Should you encounter a CPU-only workload, you can change the cooling sensor from GPU to CPU.
Click the iCue icon in the bottom right hand corner of the screen near the clock as pictured below, then follow the video to change the sensor.
BEWARE: I set the sensor to follow the GPU because the system doesn’t get enough cooling when following the CPU while gaming, because it’s so cold. Changing the sensor to CPU is only good for non-gaming workloads and will cause overheating in games!
If you are a gamer, you should leave it on GPU!
- Thermally Constrained Case
- If it looks thermally constrained, it is and should be avoided.
- Many cases on the market are subpar, subjecting your components to excessive heat and potentially shortening their lifespan or even causing system crashes.
- Avoid cases lacking an open mesh front panel to ensure adequate airflow. The prevalence of early component failures in gaming desktops often stems from inadequate ventilation due to closed-off or glass front panels.
- Inadequate CPU Cooler
- If the CPU is locked (AMD non-X or Intel non-K) then low end air cooling is all that is required. The stock cooler is sufficient.
- For quieter operation, recommend upgrading the cooler.
- If the CPU is unlocked (AMD X or Intel K) then water cooling is recommended, and your highest attainable clocks will be limited by the cooler chosen.
- High-end air cooling also works well, however it lowers the gap required for age induced performance degradation, which is an inevitable development.
- If budget constrained, choose a less critical important component to reduce budget on or get a locked processor.
- Unlocking CPUs demands more than just paying their premium price; it necessitates additional investment in adequate cooling, airflow, and power.
- Unless gamers are ready to allocate resources for these essentials, opting for locked CPUs is often a more practical choice.
- Doing so also frees up your parts budget for more impactful choices like a better GPU or larger SSD.
- Having an over-spec CPU cooler means you can run the fans on a much quieter fan curve, and allows for a full fan stop at idle to minimize dust collection, which is not possible with air cooling.
- The trusted brands are Arctic and Corsair
- Except NZXT M22 or any pump-in-rad designs.
- Most inexpensive AIO brands have reliability issues, slow (1-2 month) warranty service time, and should be avoided.
- Water cooling also has the advantage of significantly higher thermal mass as well as dispersion of heat away the other hot neighboring components.
- Budget $100-$200 for a good 280/360/420 AIO.
- If the CPU is locked (AMD non-X or Intel non-K) then low end air cooling is all that is required. The stock cooler is sufficient.
- Inadequate Case Fan Quantity and/or Orientation
- For more info on proper fan configurations: https://robotatx.com/home/builds/#FANS
- For more info on proper fan configurations: https://robotatx.com/home/builds/#FANS
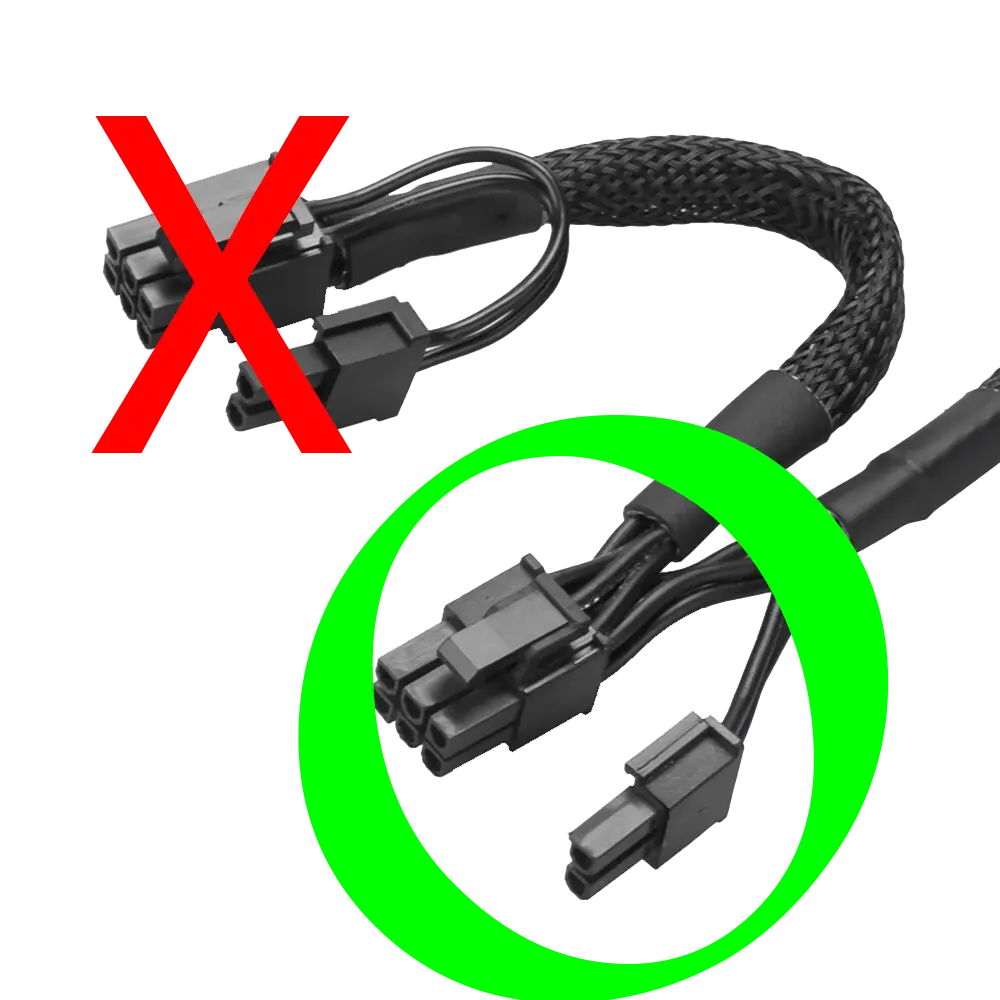
- Improperly Wired GPU
- Your power supply includes at least two PCIE power cables.
- Use one entire cable for each power connector on your GPU.
- Do not use the pigtail connector on each PCIE power cable.
- See photo below for example.
- See photo below for example.
- Improperly Installed M.2 SSD
- Your motherboard includes the standoffs and screws needed to fasten your M.2 style SSD(s) to the board in the original box. The standoffs and/or screws usually do not come affixed to the board.
- Don’t remove the SSD stand-off and use it as a way to fasten it to the board. This is a very common mistake and can cause the board, SSD, or both to short out including loss of data.

⚠️Never install a SSD like this. - The SSD must also have a heatsink attached. If your board didn’t include one then buy one or your drive with throttle, have a decreased lifespan, or short out against the motherboard.
- Your motherboard includes the standoffs and screws needed to fasten your M.2 style SSD(s) to the board in the original box. The standoffs and/or screws usually do not come affixed to the board.
For comprehensive build guidance, visit robotatx.com/builds
AMD: A History of Advanced Marketing Deception
Buyer beware
AMD has a long history of litigation with former (and current) partner and x86 creator Intel.[290][291][292]
- 1986 Intel broke an agreement it had with AMD to allow them to produce Intel’s micro-chips for IBM; AMD filed for arbitration in 1987 and the arbitrator decided in AMD’s favor in 1992. Intel disputed this, and the case ended up in the Supreme Court of California. In 1994, that court upheld the arbitrator’s decision and awarded damages for breach of contract.
- 1990 Intel brought a copyright infringement action alleging illegal use of its 287 microcode. The case ended in 1994 with a jury finding for AMD and its right to use Intel’s microcode in its microprocessors through the 486 generation.
- AMD K5 and K6 Processors:
- In the mid-1990s, AMD aimed to challenge Intel’s dominance in the CPU market with its K5 and K6 processor lines.
- Despite initial promise, the K5 and K6 processors faced performance and compatibility issues, failing to gain widespread adoption.
- These setbacks hindered AMD’s competitiveness in the CPU market and led to financial losses for the company.
- 1997 Intel filed suit against AMD and Cyrix Corp. for misuse of the term MMX. AMD and Intel settled, with AMD acknowledging MMX as a trademark owned by Intel, and with Intel granting AMD rights to market the AMD K6 MMX processor.
- 2005 following an investigation, the Japan Federal Trade Commission found Intel guilty of a number of violations. On June 27, 2005, AMD won an antitrust suit against Intel in Japan, and on the same day, AMD filed a broad antitrust complaint against Intel in the U.S. Federal District Court in Delaware. The complaint alleges systematic use of secret rebates, special discounts, threats, and other means used by Intel to lock AMD processors out of the global market. Since the start of this action, the court has issued subpoenas to major computer manufacturers including Acer, Dell, Lenovo, HP and Toshiba.
- 2009 Intel agreed to pay AMD $1.25bn and renew a five-year patent cross-licensing agreement as part of a deal to settle all outstanding legal disputes between them.[293]
- AMD Bulldozer Architecture:
- In the early 2010s, AMD introduced the Bulldozer microarchitecture, aiming to compete with Intel’s Core series processors.
- Bulldozer processors, including FX and Opteron variants, suffered from underwhelming performance and high power consumption compared to Intel’s offerings.
- The Bulldozer architecture failed to meet the performance expectations of consumers and enthusiasts, resulting in market disappointment and criticism.
- 2015 Deceptive Advertising Class Action Lawsuit Filed Against AMD
- 2017 AMD Radeon RX Vega GPUs:
- AMD’s Radeon RX Vega graphics cards, launched in 2017, aimed to challenge Nvidia’s dominance in the high-end GPU market.
- Despite competitive pricing and innovative features, RX Vega GPUs faced issues such as high power consumption, heat output, performance inconsistencies, and high failure rates.
- These shortcomings limited the appeal of RX Vega GPUs among gamers and content creators, leading to disappointing sales and market reception.
- 2019 AMD to pay out $12.1 million in false advertising class action suit over Bulldozer chips
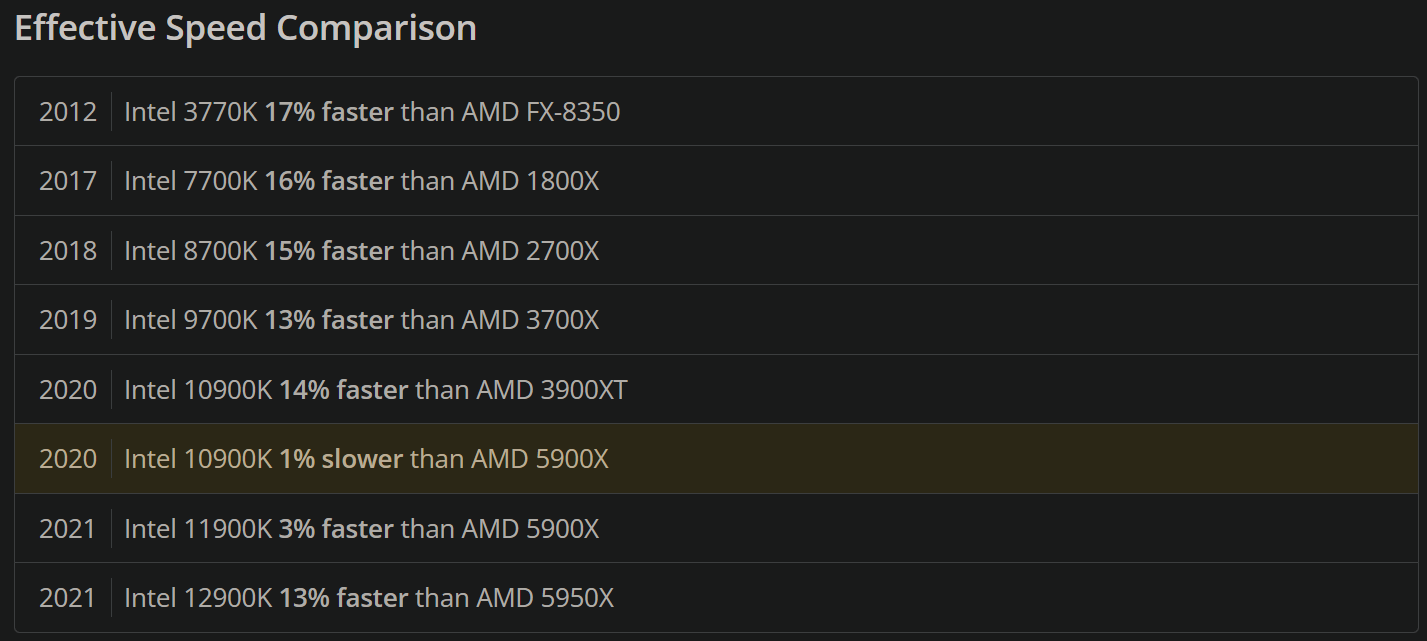
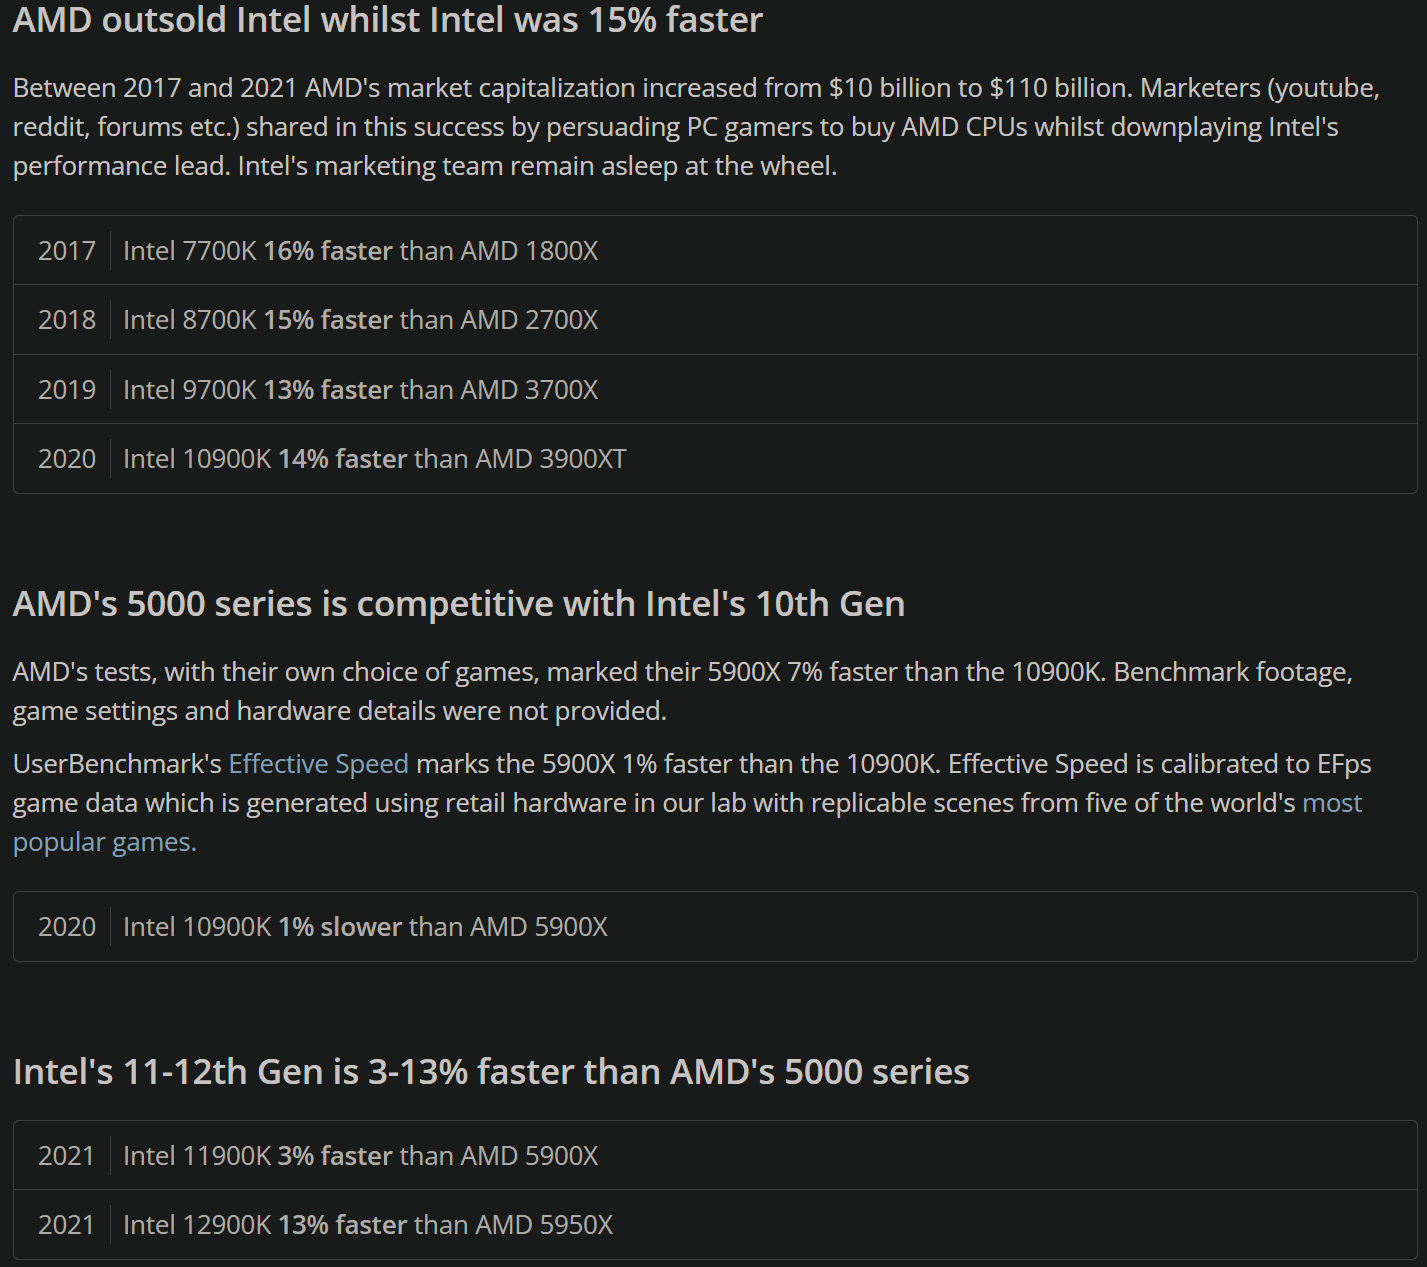
Intel were unchallenged until 2020 when AMD claimed the lead.
- 2021 AMD Ryzen 5000 Series CPUs
- While AMD’s Ryzen CPUs have generally received praise for their performance and value proposition, the Ryzen 5000 series faced criticism for limited availability and compatibility issues at launch.
- Some early adopters reported issues such as USB connectivity problems and memory compatibility issues, tarnishing the initial rollout of the Ryzen 5000 series.
- Mr. Robot has encountered countless dead Ryzen 5000 series CPUs in 2021, mostly launch purchases, tarnishing the initial rollout of the Ryzen 5000 series.
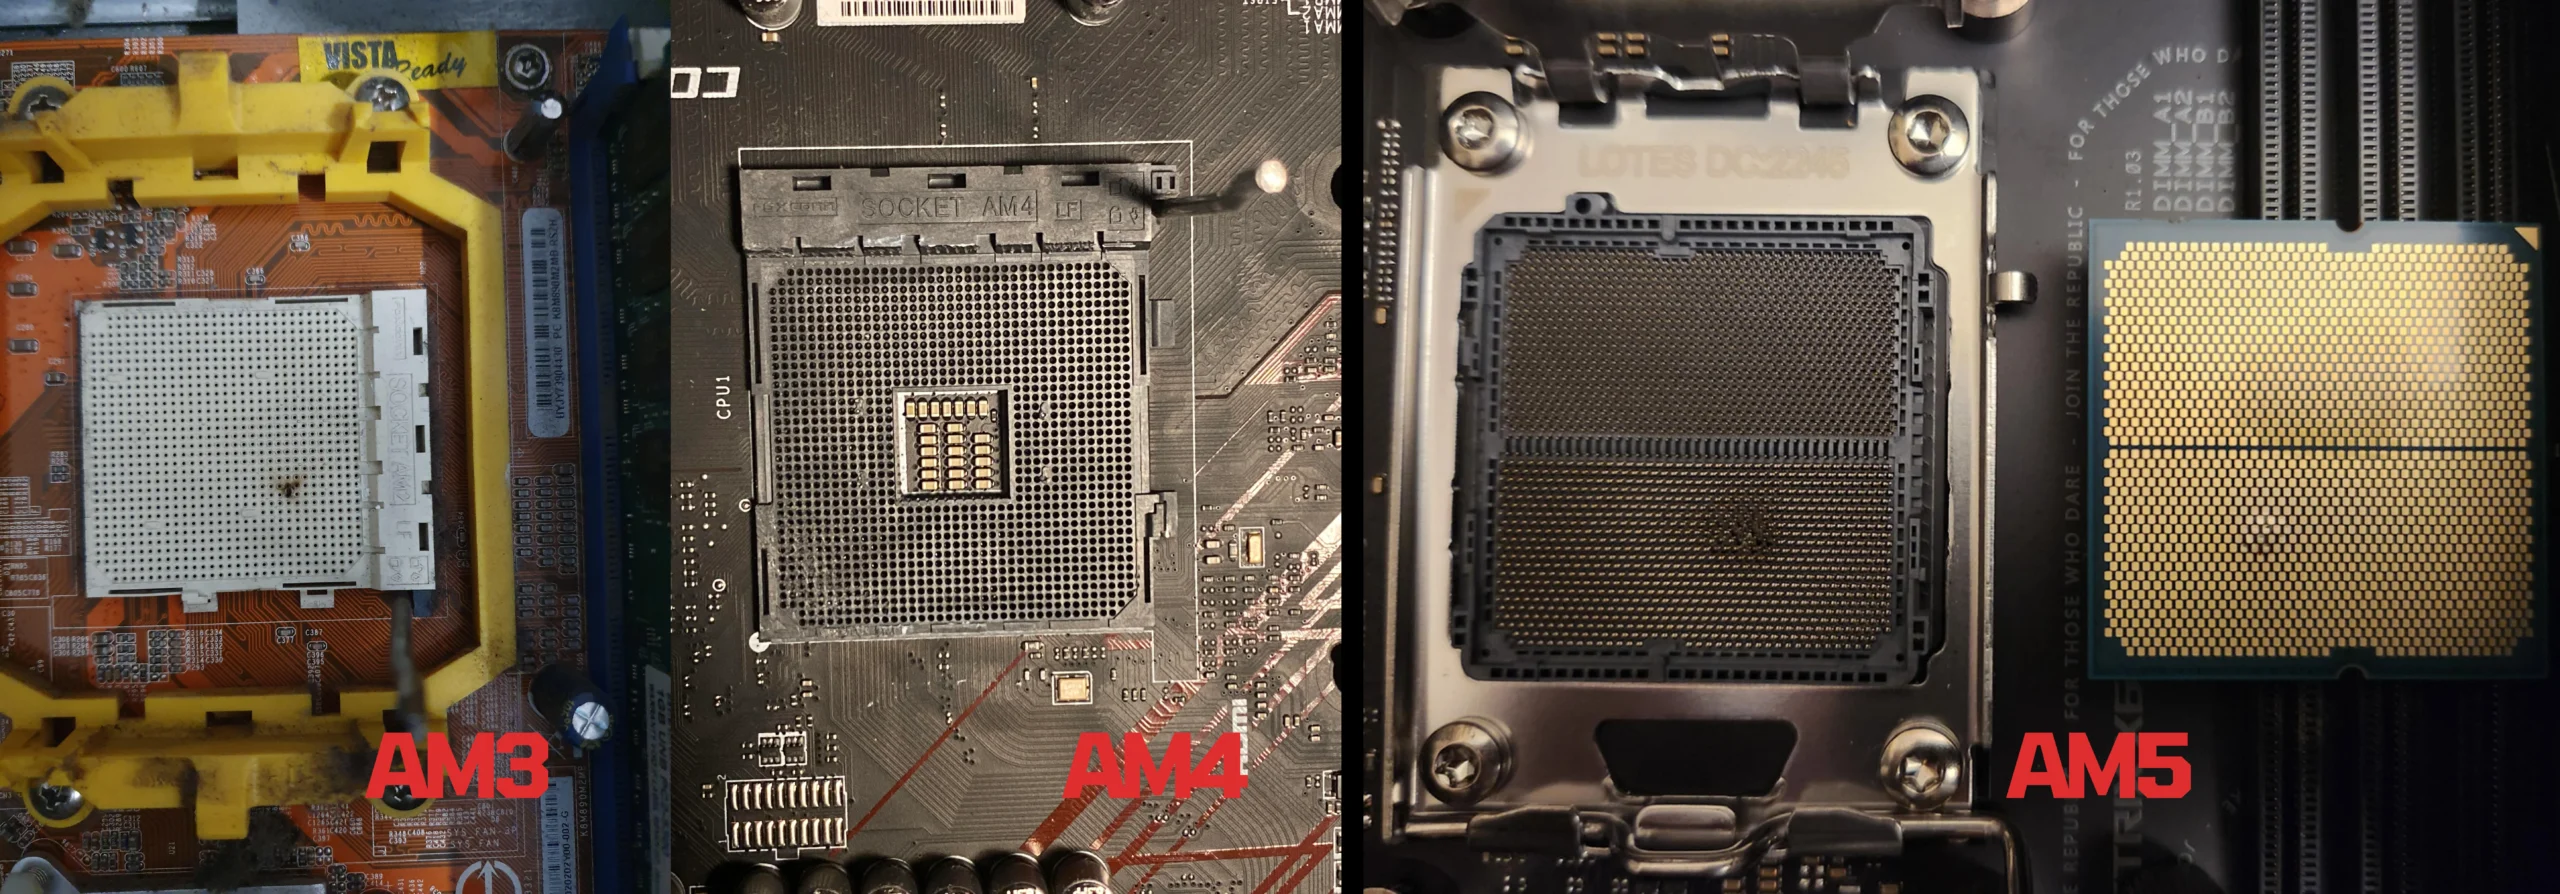
- Mr. Robot has also encountered fried memory modules specifically only with AMD systems, due to Ryzen overvolting them +20% over SET, on AM3, AM4, and AM5 platforms. SET vs. GET Overvolt confirmed with Fluke Digital Circuitry Test Tools.
- The Ryzen 5600 at $139 is a budget alternative option for someone who already has an AM4 platform, as it avoids the AM5 or LGA1700 platform entry cost.
However the Intel 14100F is 20% faster & 15% less money and is a better choice for new builds. - The 5600X3D at $229 is the best value 3D cache CPU in the AMD lineup for gamers that already have an AM4 platform and play titles that benefit from the large 3D cache, otherwise it has performance regression vs. non-X3D in titles that do not benefit from it due to the lower clocks.
However, the Intel 14400F is 20% faster & 10% less money and is a better choice for new builds. - The 5800X3D at $299 is a more expensive X3D option for someone who already has an AM4 platform, as it avoids the AM5 or LGA1700 platform entry cost.
However the Intel 14500 is 20% faster for 20% less money AND the Intel 14600KF is 30% faster for the same money and either is a better choice for new builds.
- While AMD’s Ryzen CPUs have generally received praise for their performance and value proposition, the Ryzen 5000 series faced criticism for limited availability and compatibility issues at launch.
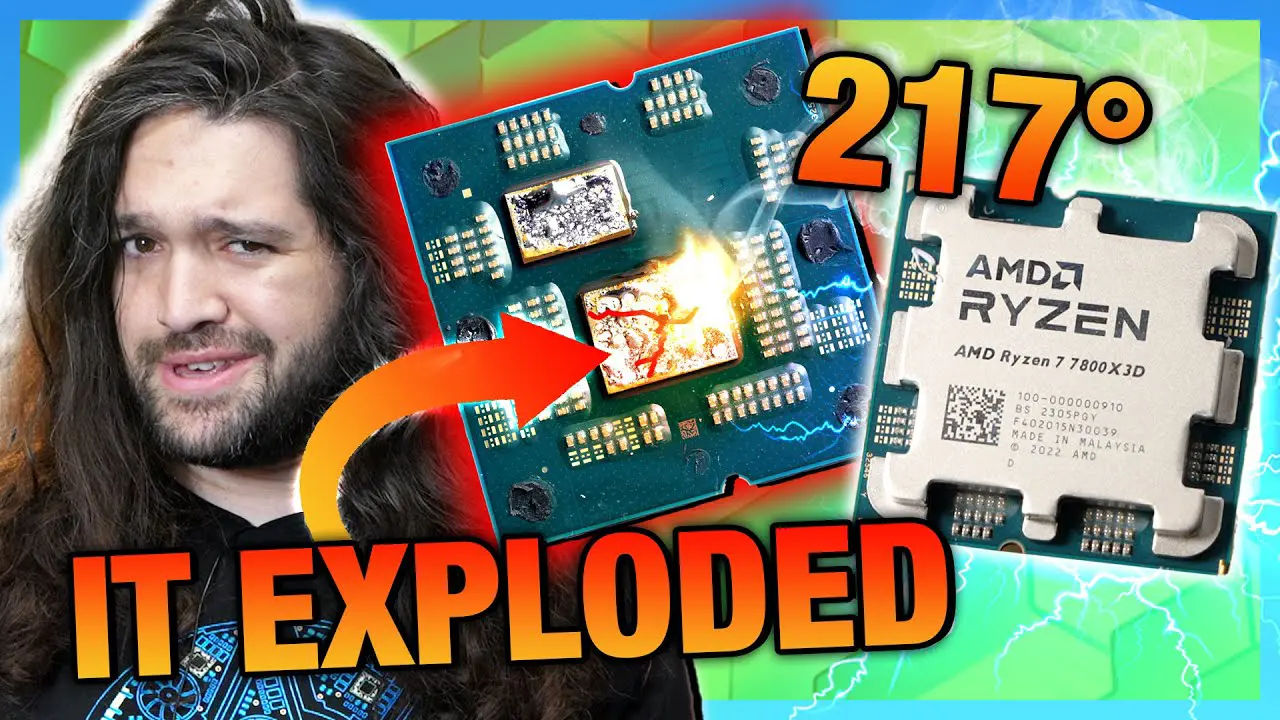
- 2022 AMD Ryzen 7000 Series CPUs
- Has an unusually thick integrated heat spreader leading to unusually high operating temperatures, due to a poor engineering choice by AMD of preserving AM4 cooler compatibility at the cost of product lifespan and performance potential.
- For more info see here: Ryzen 7000 Delidding – Unreal Temperature improvement with Direct-Die Cooling
- Bad CPU / cooler combinations can create performance degradation so extreme that a lower end processor would be faster just because the CPU cooler can keep up.
- Has unusually high operating temperatures which will lead to decreased CPU lifespan.
- AMD says the absurdly high temperatures are okay, but they only stand to make money by decreasing the lifespan of their products and blanket accepting abnormally high operating temperatures that make Intel’s seem tame.
- If you choose to build AMD, go non-X or if getting the X then plan to de-lid.
- See Thermal Management section for de-lid tool and contact frame in the Ordering Guide – Mr. Robot
- X not recommended unless the processor is water cooled, and either de-lidded or kneecapped with custom PBO power limits to avoid overheating.
- See Thermal Management section for de-lid tool and contact frame in the Ordering Guide – Mr. Robot
- If you choose to build AMD, go non-X or if getting the X then plan to de-lid.
- The energy cost and room heating difference between X and non-X is significant and merits careful consideration.
- The 7600 is the current best value in the AMD lineup for gamers.
However, the Intel 14400F is the same speed & 10% less money and is a better choice for new builds. Additionally, the Intel 14500 is 7% faster & 6% more money and is also a better choice for new builds.
- Has an unusually thick integrated heat spreader leading to unusually high operating temperatures, due to a poor engineering choice by AMD of preserving AM4 cooler compatibility at the cost of product lifespan and performance potential.
- 2023 Ryzen 7000X3D series CPUs
- Have the same core architecture as the rest of the 7000 series but they have one group of eight “3D” cores with extra cache. The “3D” cores are priced higher but run at 10% lower clocks.
- For most real-world tasks performance is comparable to the 7000X variants. Cache sensitive scenarios such as low res. canned game benchmarks with an RTX 4090 ($1,599) benefit at the cost of everything else.
- Be wary of sponsored reviews with cherry picked games that showcase the wins, ignore frame drops and gloss over the losses.
- Also watch out for AMD’s army of Neanderthal social media accounts on Reddit, Forums and YouTube, they will be singing their own praises as usual. AMD continues to develop “Advanced Marketing” relationships with select youtubers in the hope of compensating for second tier products with first tier marketing.
- PC gamers considering any 7000X3D CPU need to work on their critical thinking skills: Influencers are paid handsomely to promote overpriced products.
- Rational gamers have little reason to look further than the $164 Intel 14600KF which offers better real-world gaming and better desktop performance at a fraction of the price.
- For most real-world tasks performance is comparable to the 7000X variants. Cache sensitive scenarios such as low res. canned game benchmarks with an RTX 4090 ($1,599) benefit at the cost of everything else.
- Have the same core architecture as the rest of the 7000 series but they have one group of eight “3D” cores with extra cache. The “3D” cores are priced higher but run at 10% lower clocks.
- 2024 Ryzen 9000 and X3D series CPUs
- AMD’s 9800X3D CPUs, priced over $480 USD, are widely marketed as “the best gaming CPUs in the world”.
- This is demonstrated at low resolutions with a x090-class GPU, whilst conveniently ignoring 0.1% lows (frame drops).
- Under cherry-picked cache-bound conditions the X3D chips do excel, but there’s a trade-off: the additional cache results in 6% lower boost clocks and 50% to 80% higher prices than their regular counterparts (9700X and 7700X).
- As with their Radeon GPUs, AMD is looking to drive demand through advanced marketing rather than delivering real-world performance.
- While Nvidia has effectively countered AMD’s marketing in the GPU space, Intel’s marketers remain asleep at the wheel.
- Nevertheless, the 13600K and 14600K still deliver almost unparalleled real-world gaming performance for around $200 USD.
- Spending more on a gaming CPU is often pointless, as games are normally limited by the GPU.
- Since this summary was published just two days ago, hundreds of twitter threads, thousands of “pcmasterrace” reddit posts, multiple magazine articles, and several youtube videos have emerged in unanimous support for the $480 USD 9800X3D.
- All of these supposedly disinterested actors are working the weekend to convince you to pay their favorite billion-dollar brand an extra $280 USD this holiday season.
- This is demonstrated at low resolutions with a x090-class GPU, whilst conveniently ignoring 0.1% lows (frame drops).
- AMD’s 9800X3D CPUs, priced over $480 USD, are widely marketed as “the best gaming CPUs in the world”.
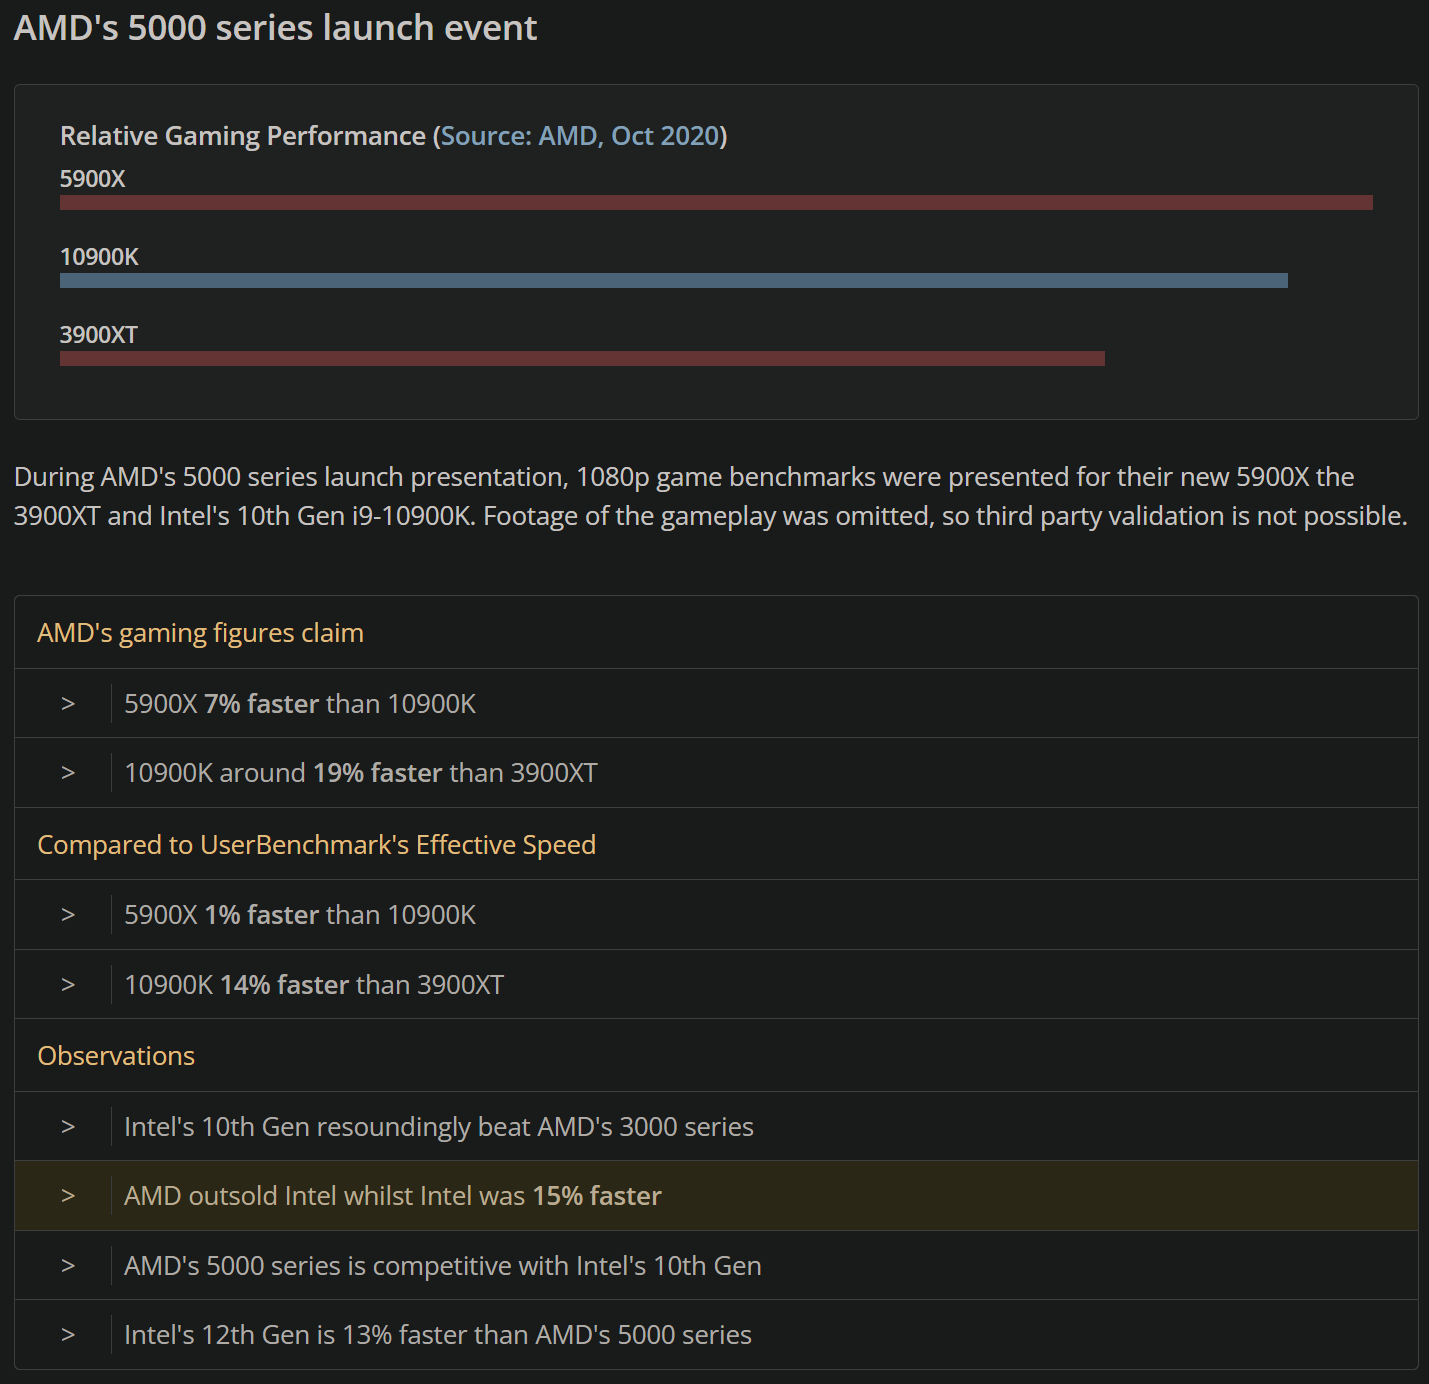
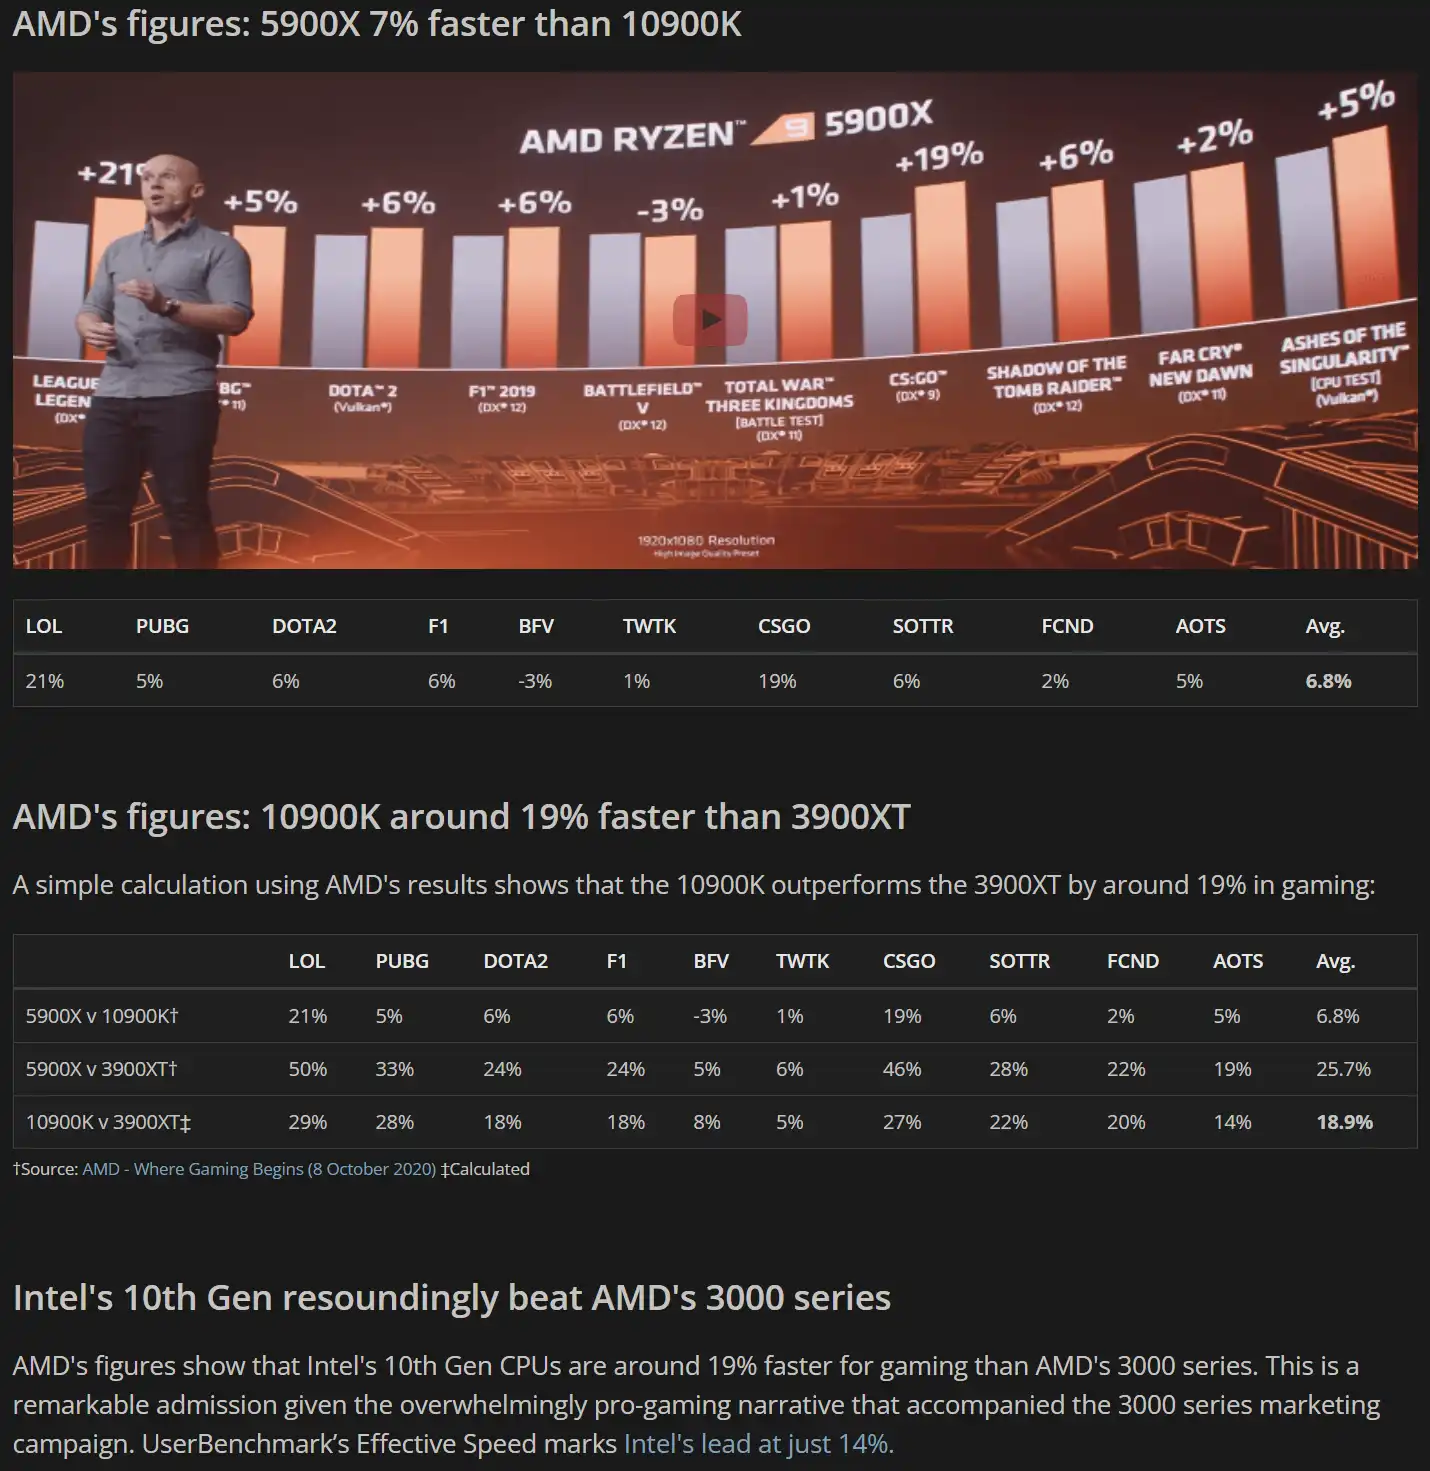
The 1080P Lie
“Independent 1440p/4K test suites are comparatively rarer in manufacturer PR — and where reputable reviewers publish them, the X3D cache advantage often shrinks substantially. That makes the 1080p‑only framing intentionally favorable to cache‑heavy claims.” – TechSpot
For those who look at benchmarks without thinking, you might be under the impression AMD is faster as they deceptively use 1080P with x90-class GPUs to exacerbate CPU differences by leveraging an obsolete resolution.
The reality is no one in their right mind spends $500 on just the CPU then pairs it with a $2,000 GPU just to play at budget resolution (1080P). A budget sufficient for that resolution is around $800-to-$1K for the entire system.
This 1080P misrepresentation is typical deceptive AMD marketing tactics, try finding benchmarks at 1440P and above where all that expensive cache they sold you on means little to nothing for real world gaming performance.
They don’t exist because if they did it would hurt their sales which is built on an excessive cache narrative that fools non-pros into overspending on unreliable products that feature industry-leading failure rates.
The truth is the GPU is almost always the bottleneck for gamers and spending several hundred on a CPU for differences at an irrelevant resolution you won’t notice is not worth the cost premium.
The 14600K has the same performance when gaming at modern resolutions such as 1440P or 2160P, for a fraction of the money, includes a 5 year warranty which is 2 years longer, and they don’t deny coverage like AMD.
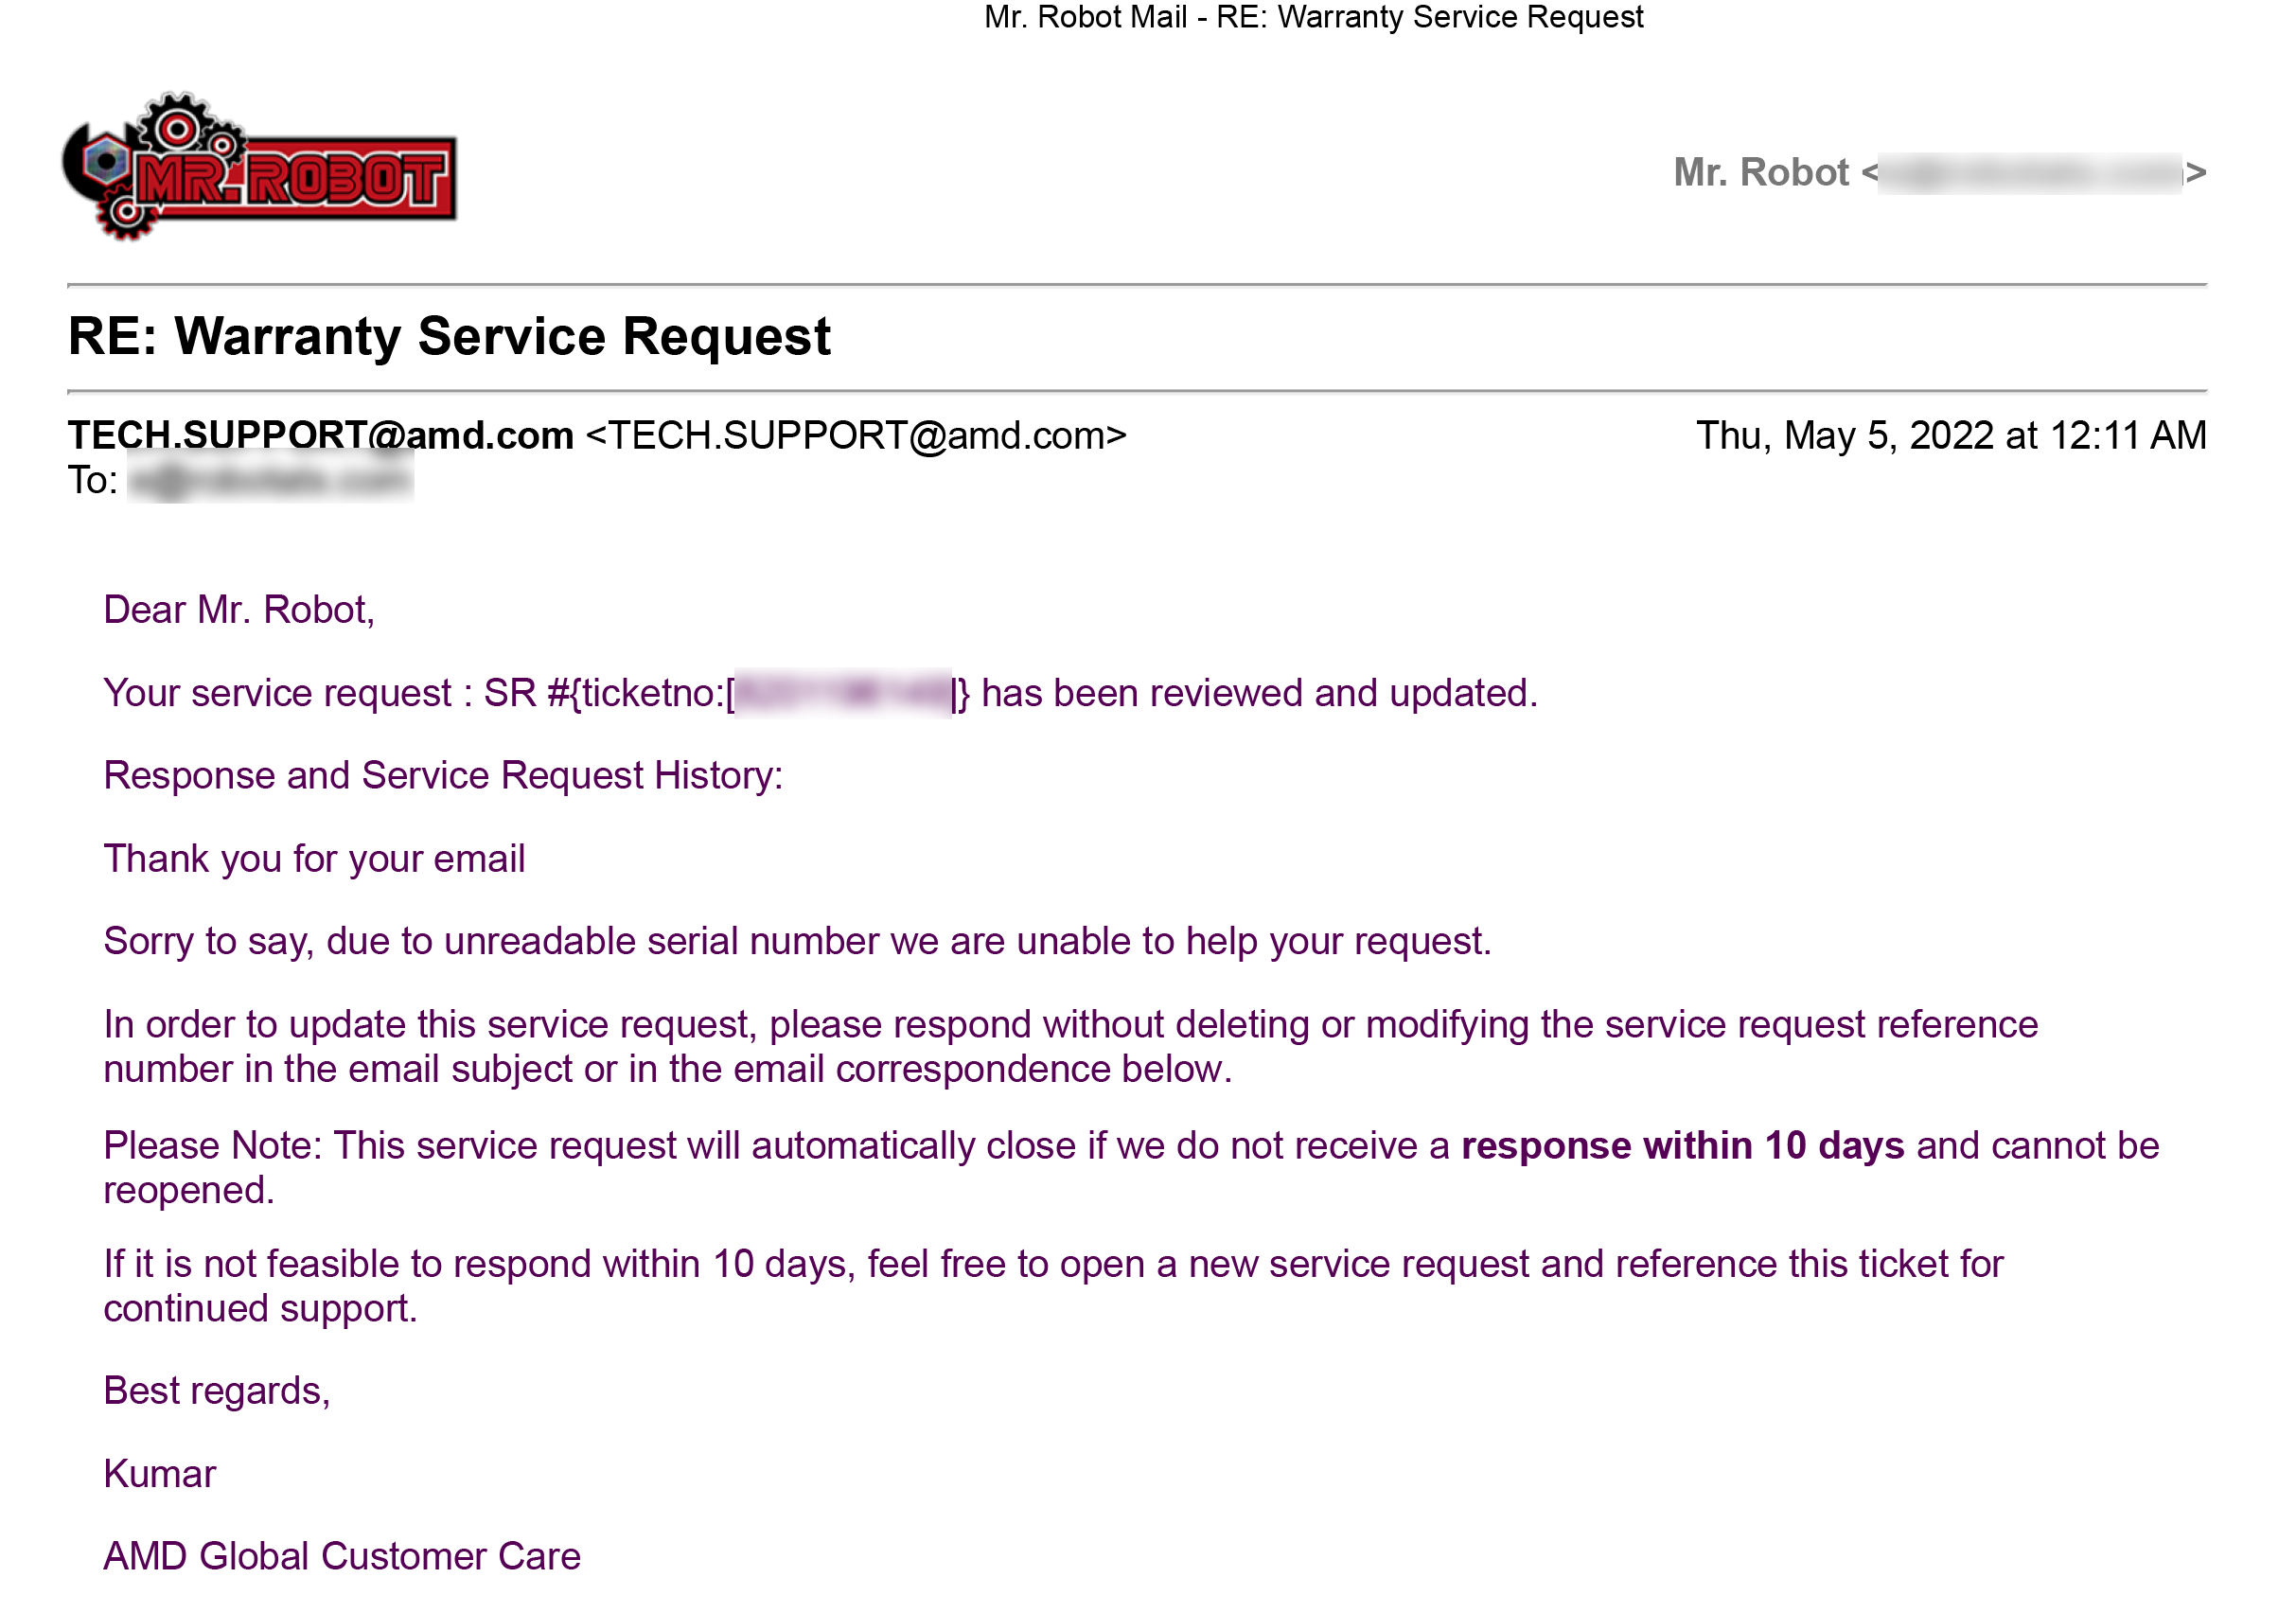
No Warranty
- AMD warranty becomes void with normal use, due to their intentionally lightly etched serial number becoming unreadable with normal operation. Intel does not have this problem and even embeds a secondary serial on the substrate as a backup.
- If AMD cannot read any character on the IHS, even parts that are not the serial, you will be denied service.
- AMD’s own writing in their warranty terms quoted below is quite revealing and should indicate to you something is off if this company is actively looking for a way to not be held accountable for their products overall poor reliability, and high failure rates.
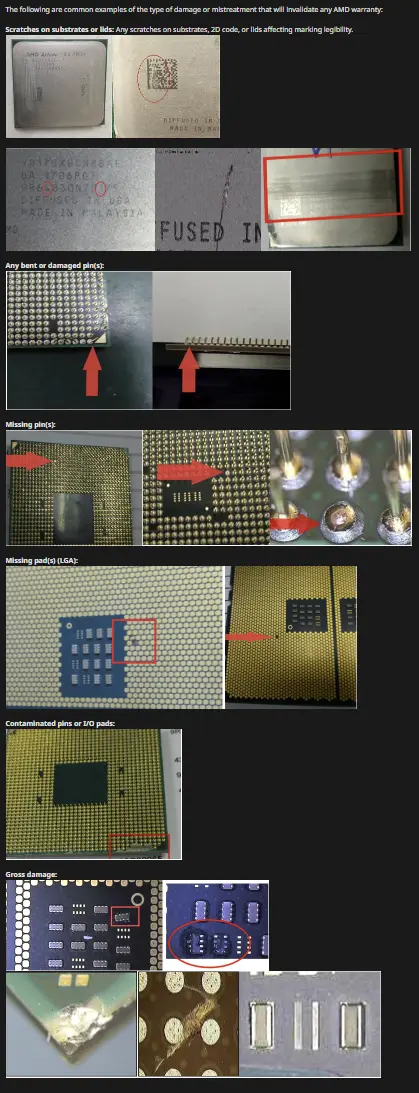
The following are common examples of the type of damage or mistreatment that will invalidate any AMD warranty: Scratches on substrates or lids. Any scratches on substrates, 2D code, or lids affecting marking legibility. - In other words, just by using the product you purchased will invalidate the warranty?
Yes. See all the superficial cosmetic reasons why AMD will reject your warranty below:
💀 Past 90 Days of Dead Ryzens
Source: Mr. Robot (22 Years of Industry Experience)
Source: AMD Processors – Builds – Mr. Robot
Source: AMD – Litigation with Intel – Wikipedia
Source: AMD – Not Covered by Warranty – AMD.com
Source: Userbenchmark.com
₪CAUTION: Following these steps will guide you to erase the data on the drive you are reinstalling windows on, if you wish to keep the data on the computer you will need to backup the data first.
This guide assumes you only have one drive installed.
- If you have any secondary drives installed, disconnect them until you complete this guide
- This procedure does not erase previous data beyond recovery if you have a HDD
To erase data beyond recovery, first visit How to erase any computer - If you have a SSD then erase is not required to destroy the data
- If you have a build or fresh install of windows from Mr. Robot
Stage Ⅰ: Prepare Installer
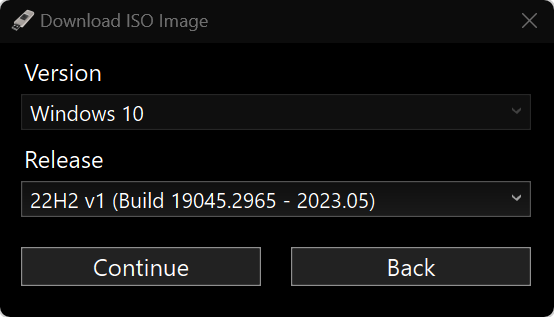
Download the ISO
Method #1: Use Windows Media Creation Tool and Rufus
Method #2: Use Rufus for Both Tasks


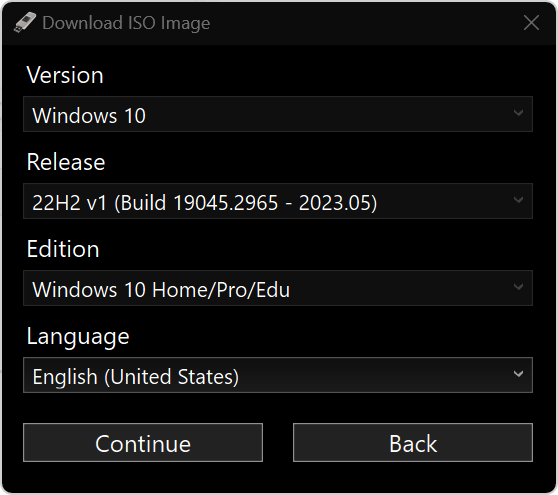
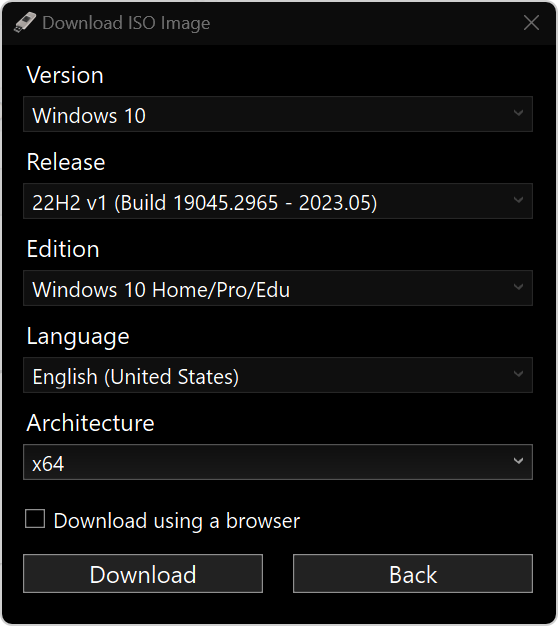

You MUST complete one of the above methods to get the ISO file before proceeding below
Create the USB
- Insert a 8GB or larger USB 3.0 thumb drive with nothing important saved on it as it will be erased.
- Choose the ISO file saved in the previously chosen method.
- Ensure partition scheme drop down menu is set to GPT.
- Click START button.
- You will receive a Windows User Experience Prompt.
For Windows 10: check bottom 3 boxes then click OK
If you want the user to automatically be created, tick the 1st box and enter name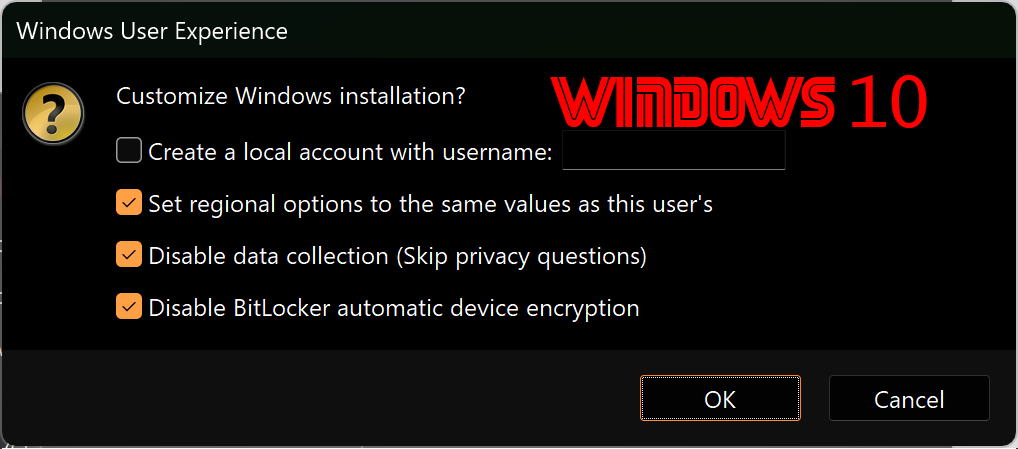
For Windows 11: check 2nd box, bottom 3 boxes then click OK
If you want the user to automatically be created, tick the 3rd box and enter name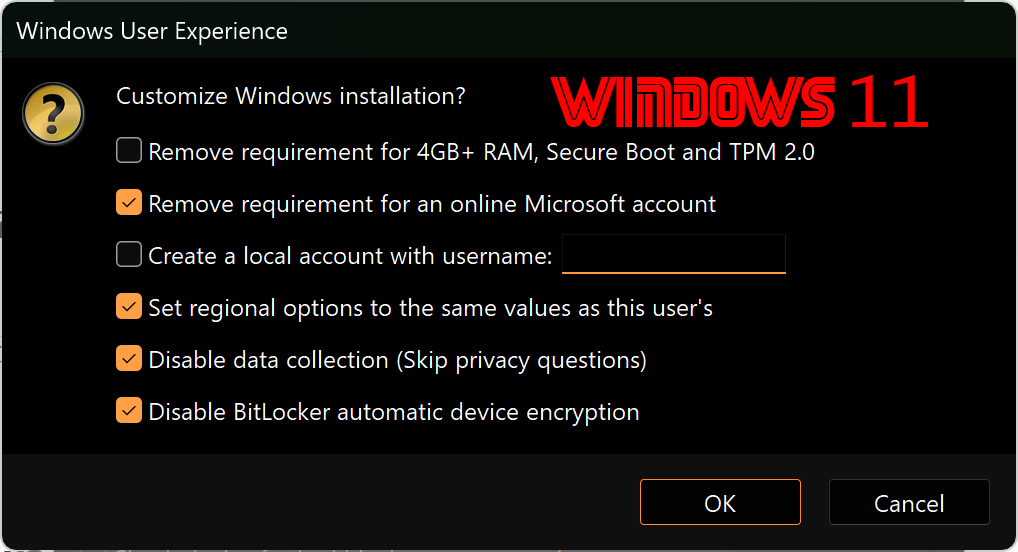
- You will receive a warning prompt that ALL DATA ON DEVICE WILL BE DESTROYED, confirm the correct USB drive is selected and click OK.
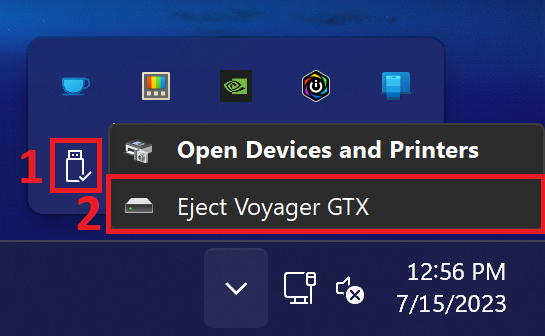
- When Rufus notifies that it’s finished, exit Rufus and eject the USB drive from the “SAFELY REMOVE HARDWARE AND EJECT MEDIA” panel in the system tray, then remove it.
Stage Ⅱ: Boot & Install
- Insert USB drive prepared in Stage Ⅰ in the computer you wish to install windows on. If you’re upgrading to a new drive prior to reloading windows, install it first.
- If you have a new or blank storage drive installed with the USB drive inserted into the system, upon booting up it should go right to the windows installer and you can proceed to step 4.
If you do not have a new or blank storage drive then- you may need to choose the USB from the boot menu
-or- - enter the BIOS to make it the first bootable device.
- you may need to choose the USB from the boot menu
- Your system should boot up to the windows installer.
You can now reload windows. - Click next/accept as prompted. If prompted for a product key, enter it if you have it or click
“I don’t have a product key“
- IMPORTANT: A Product Key is not required. All laptops and desktop computers that have had windows installed previously with secure boot / UEFI enabled have the product key embedded in the BIOS and will automatically activate windows upon connection to internet.
- IMPORTANT: A Product Key is not required. All laptops and desktop computers that have had windows installed previously with secure boot / UEFI enabled have the product key embedded in the BIOS and will automatically activate windows upon connection to internet.
- When prompted for custom or upgrade install, choose custom.
- If you have a new or blank drive, just click Next and proceed to the next step. Otherwise, follow the steps below:
Delete any partitions on the drive you are reinstalling windows on at the partition screen by selecting each partition and clicking delete and yes to each confirmation until the only thing left listed is:
Drive 0 unallocated space
Then click Next and windows will automatically create the system, reserved, and primary partitions and install Windows.
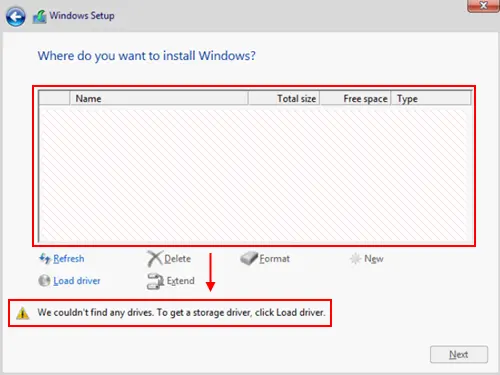
Not seeing the installed drive listed? - Once the installer says it will reboot your computer in 15 seconds, click reboot now and remove the USB drive.
If you miss this step, the system may inadvertently boot up to windows installer USB again. If that occurs simply unplug the USB and reboot. - This part is only necessary if you needed to complete step 2.
Enter the BIOS again and set your 1st boot device to:- Windows Boot Manager
- Disable ALL other entries or options, including USB, network, or PXE boot options.
- Save and exit. (usually F10)
- Windows Boot Manager
- Once you get booted up to windows, follow the prompts to setup your system:
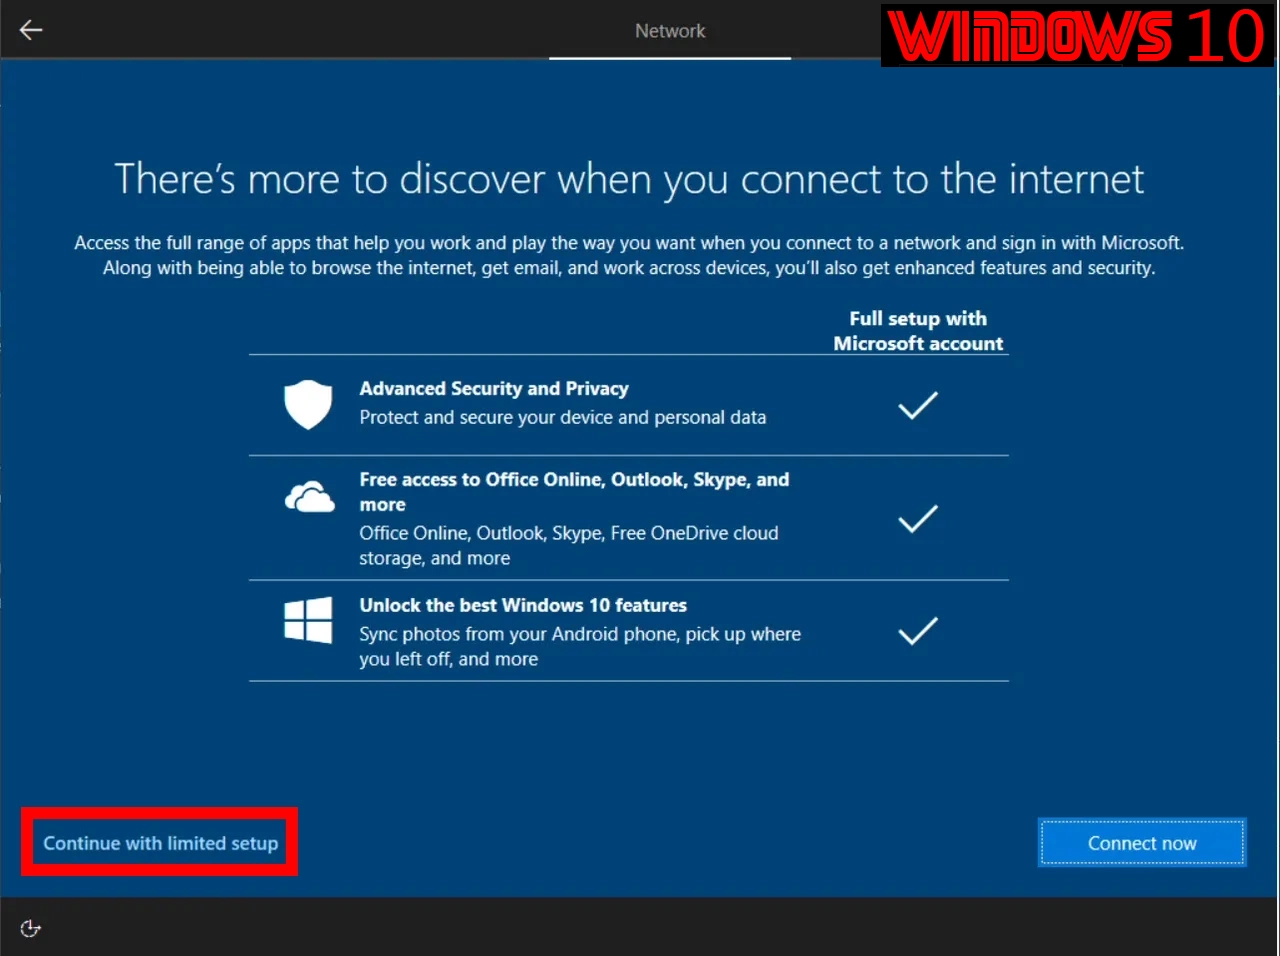
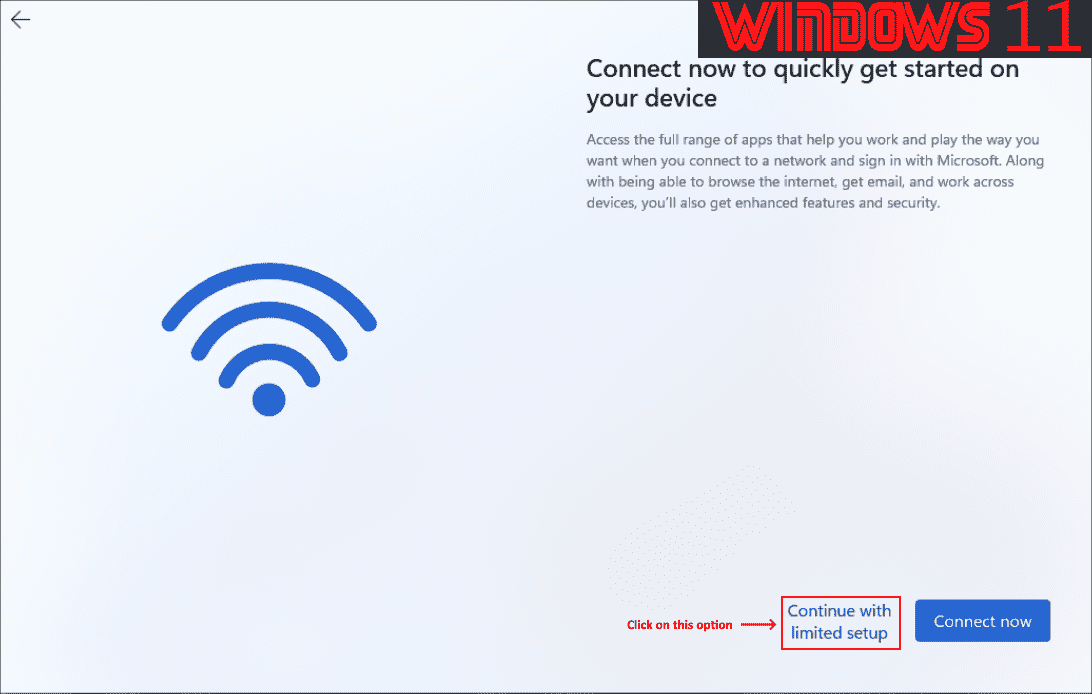
- Avoid having to use a Microsoft account to login to the computer, do not connect to the internet yet and select I don’t have internet when prompted.
- Choose continue with limited setup
- You will prompted to provide a password during user creation, if you leave it blank, you won’t have to use one. I recommend using a strong login password and not reusing passwords in any manner.
- Check if the password you are using is compromised by using Google Password Checkup
Stage Ⅲ: Drivers + BIOS
- Now that you have circumvented being forced to use a Microsoft account, you can proceed to connect to the internet. Can’t connect to internet or see Wi-Fi networks?
- Now that you’re connected, immediately go to windows update and click pause updates.
- Proceed to install the appropriate drivers for your system according to it’s brand as followed:
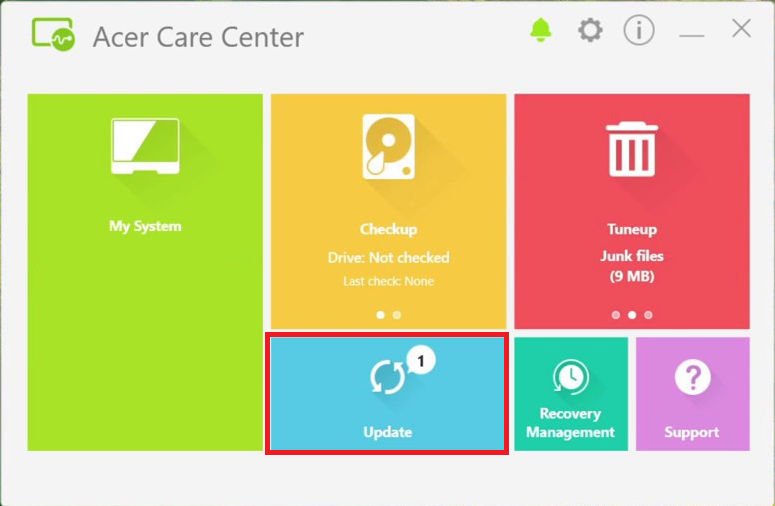
Acer:
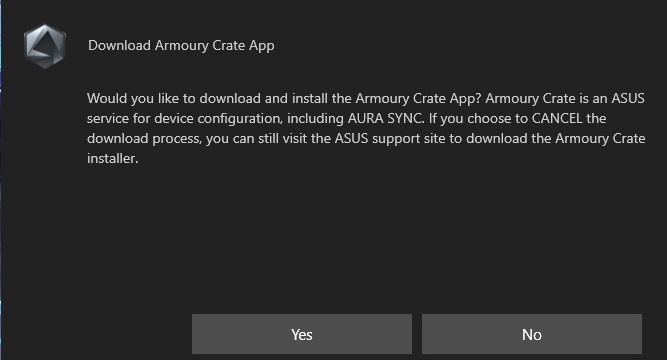
ASUS:
Method 1: GHelper
Method 2: ArmouryCrate
Method 3: MyASUS
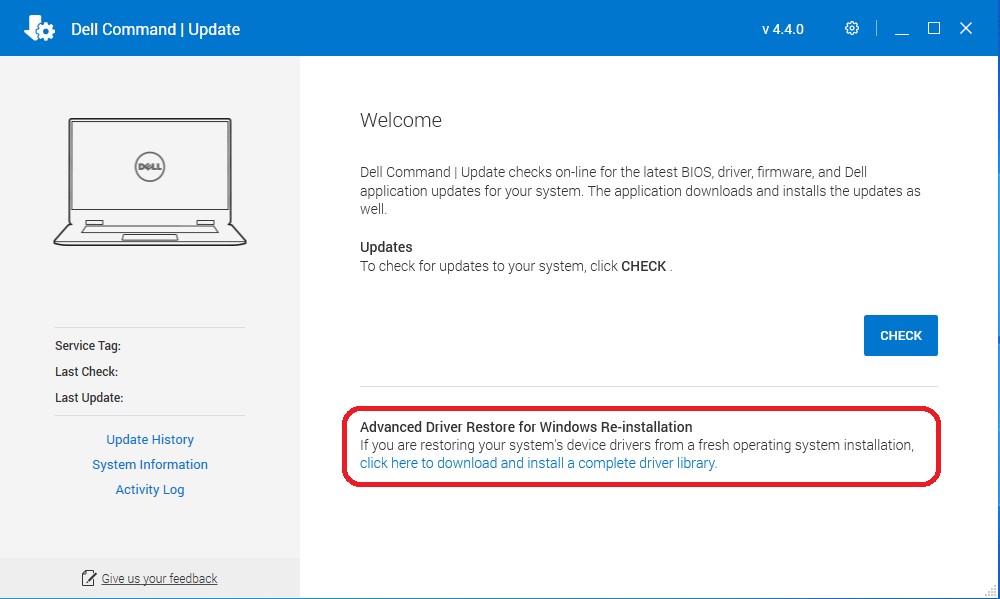
Alienware Dell:
HP:
Lenovo:
Custom computers only:
ALL computers:
Due to a lack of diligence by most brands, they are often missing the latest drivers for their products which resolve significant functionality, security and performance issues. When that is the case it is preferred to use the newer version from the OEM. Here are a few common examples below:- AMD Chipset drivers should always be downloaded from the AMD support site, not from the system or motherboard manufacturer.
- Graphics drivers should always be downloaded from their respective manufacturer website, such as Intel, AMD, or nVidia, not from the system or motherboard manufacturer.
- Intel Wi-Fi/Bluetooth drivers should always be downloaded from Intel, not from the system or motherboard manufacturer.
- Once all drivers have been installed, open device manager
- To open device manager: Press Win+X then M
- Confirm there are no exclamation marks or unknown devices listed
- If there aren’t any, proceed to next step.
- If there are any:
- Resume windows update and install all updates offered. Reboot and run windows update again, reboot if prompted. Repeat until no more updates are offered.
- Run disk cleanup to cleanup all the windows update temp files.
- Start Menu > Type disk cleanup > Right-click Run as administrator
- Start Menu > Type disk cleanup > Right-click Run as administrator
- Update the BIOS by manually downloading it using the appropriate resource for your system determined previously in stage Ⅲ, step 3.
- For those with custom computers
- Avoid updating BIOS from within windows to mitigate procedural risk. You can also use the BIOS Flashback feature to update BIOS, if available. For directions, visit: How to use BIOS Flashback
- You may need to save the BIOS update to a USB drive in order to update it from within the BIOS. It can be the same USB drive prepared in this guide.
- However, many modern systems can update BIOS from within the BIOS with the extracted BIOS update file on the installed SSD, eliminating the need for a USB drive.
- Recommend to enable XMP or DOCP in the BIOS afterwards for enhanced performance.
- Fan Tuning Recommended. For fan tuning guidance, visit: Improved Fan & RGB Control for Gamers
- For those with custom computers